
Wallet

The Wallet page is where you manage your account balance, fund your usage, and track incoming payments and rewards. Since AISA operates on a usage-based billing model, your wallet balance is used to cover API consumption across AI models and per-call endpoints.
Maintaining a sufficient balance ensures uninterrupted access to the platform.
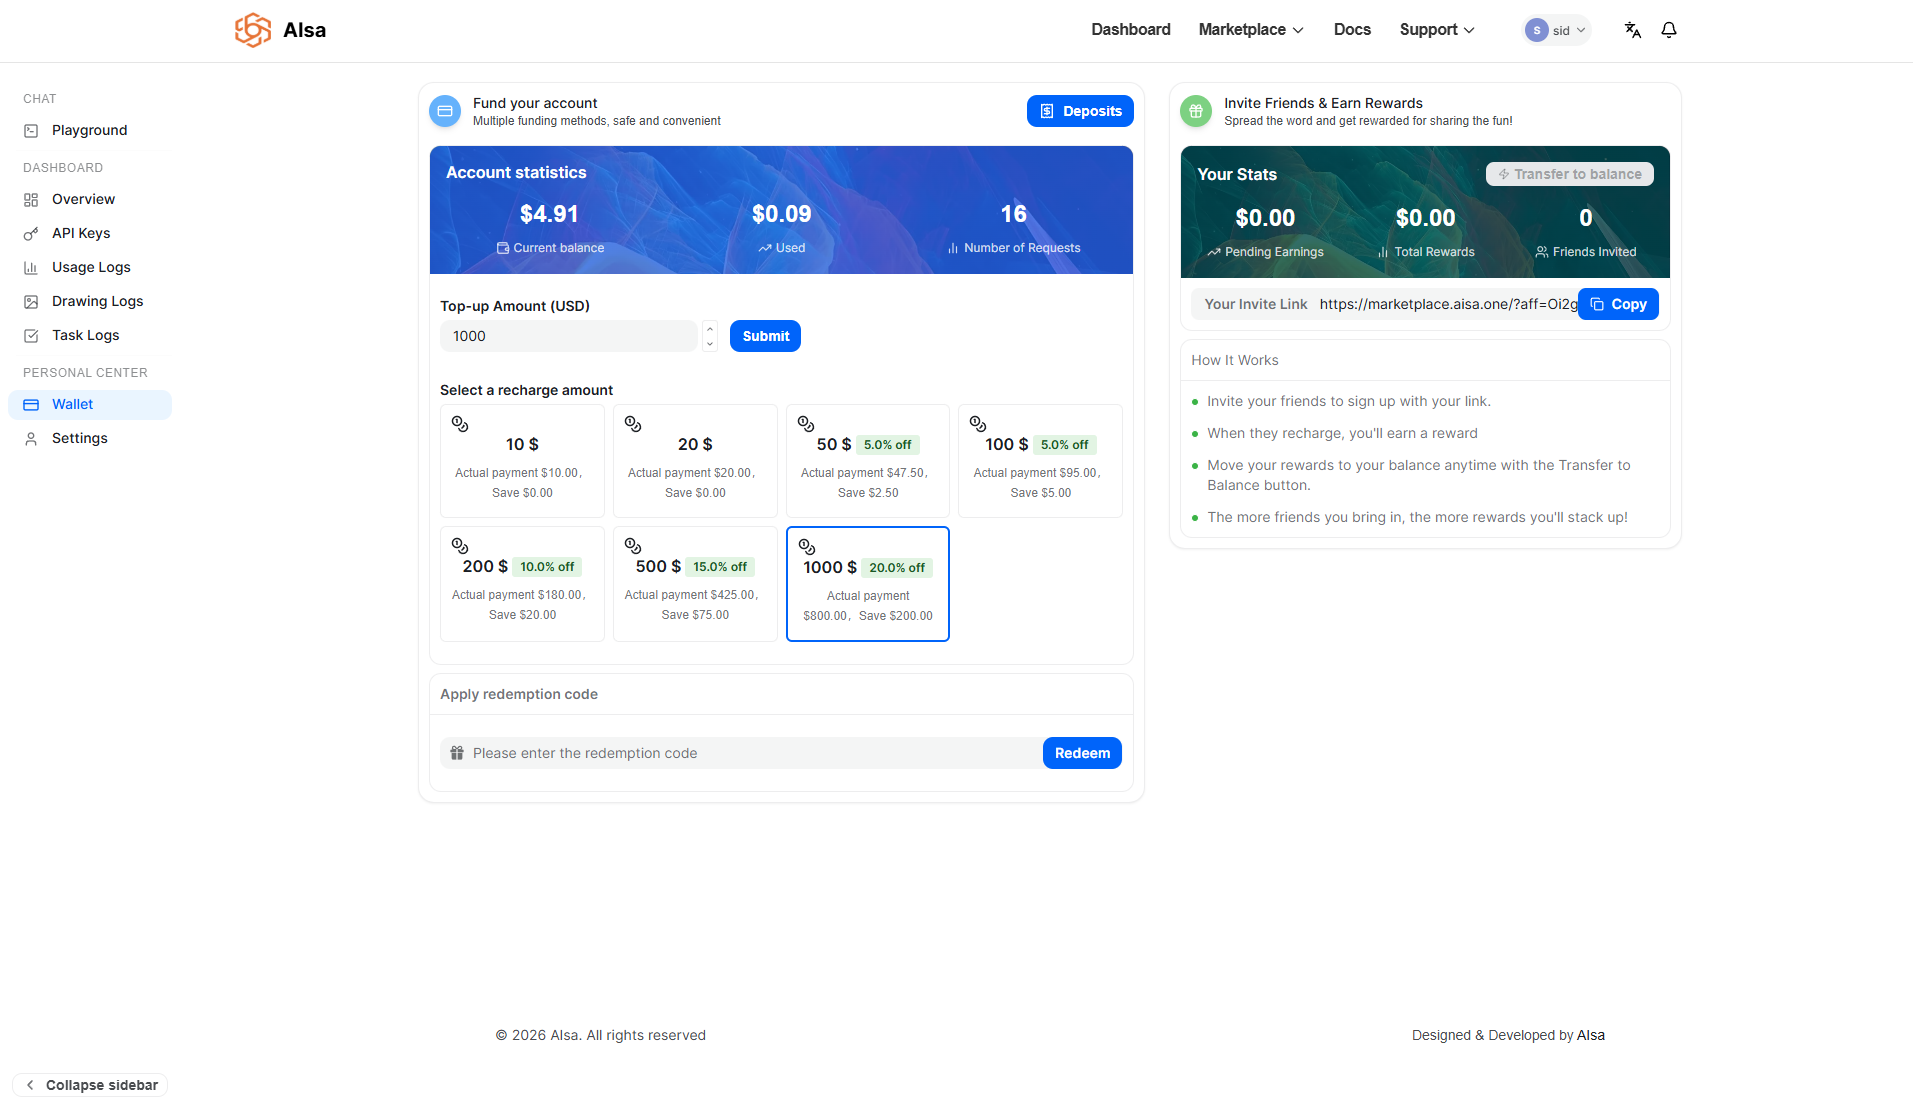
Account Overview
At the top of the Wallet page, you’ll find a summary of your account’s financial activity. This includes:
- Current balance: The amount currently available for API usage
- Used amount: The total amount already spent
- Number of requests: The total number of API calls made
Together, these metrics provide a quick snapshot of usage and spending.
Funding Your Account
To continue using AISA services, you can top up your balance at any time. The platform supports two payment methods:

- Card payments processed via Stripe
- Stablecoin payments handled through AISA’s native crypto payment system
Both methods credit funds to your wallet once the payment is successfully confirmed.
In addition to custom amounts, predefined recharge tiers are available and may include volume-based discounts.
Top-Up Amounts and Volume Discounts
You may either enter a custom top-up amount or select from predefined recharge tiers. Larger top-ups qualify for discounted pricing.
For example:
- $50 → 5% discount
- $100 → 5% discount
- $200 → 10% discount
- $500 → 15% discount
- $1000 → 20% discount
When selecting a discounted tier, the confirmation screen clearly displays:
- The original amount
- The discount applied
- The final payable amount
The credited balance reflects the discounted payment once the transaction is successfully confirmed.
Adding Credits to Your Wallet
Below is the complete step-by-step process for funding your account.
Step 1: Select a Top-Up Amount
On the Wallet page, either:
- Enter a custom amount in the Top-up Amount (USD) field, or
- Select one of the predefined recharge tiers
After choosing your desired amount, click Submit to proceed.
Step 2: Review the Top-Up Confirmation
A Top Up Confirmation modal appears before payment is processed.
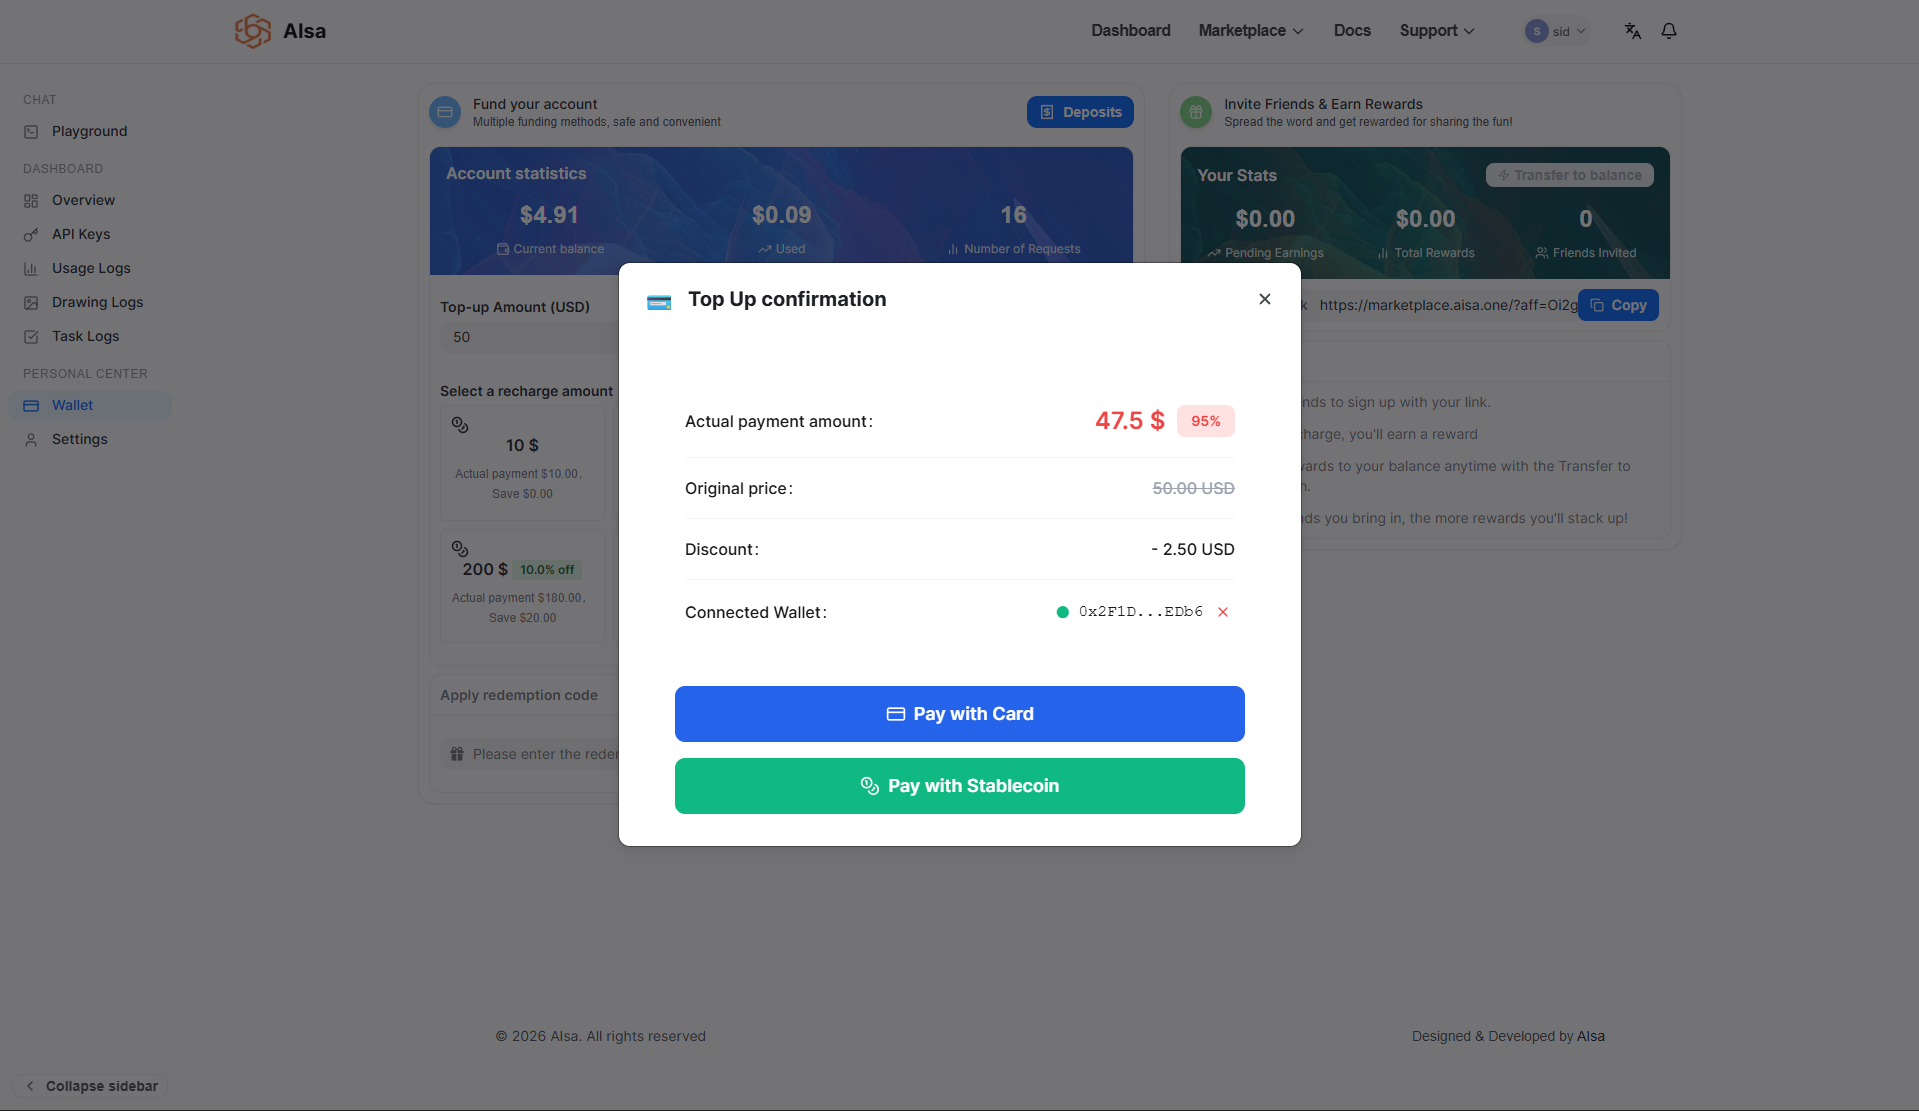
This screen displays:
- Actual payment amount
- Original price
- Discount applied (if any)
- Connected wallet (for stablecoin payments)
- Spending limit (for stablecoin payments)
This step ensures you clearly understand the final payable amount before continuing.
From here, you can choose your preferred payment method:
- Pay with Card
- Pay with Stablecoin
Card Payment Flow (Stripe)
If you select Pay with Card, the following process occurs:
Step 3: Stripe Checkout
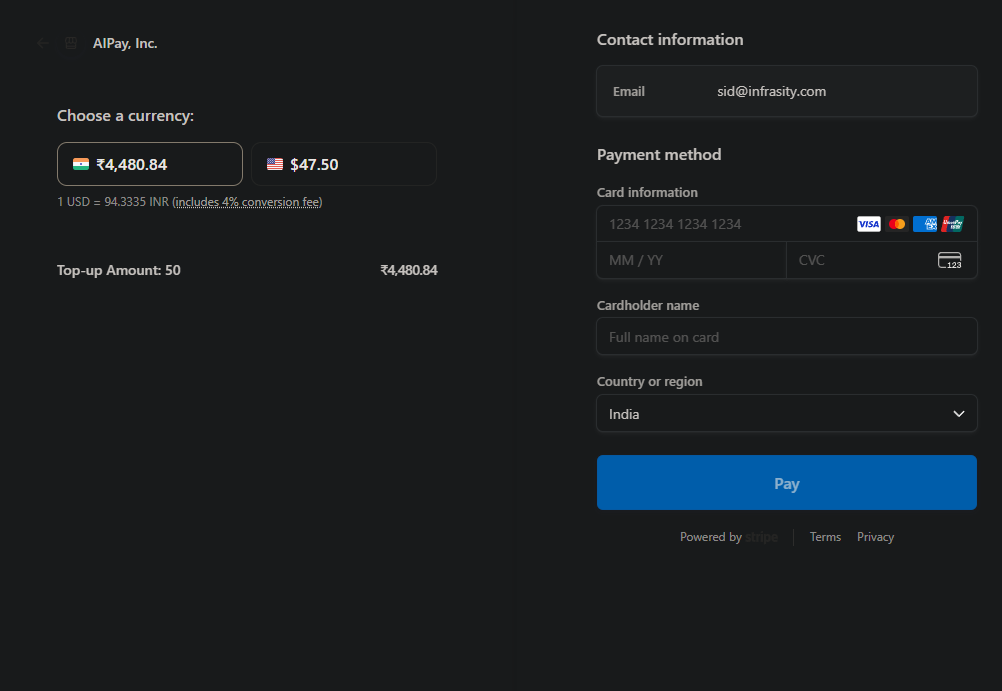
You are redirected to a secure Stripe checkout page where you:
- Choose your preferred currency (if supported)
- Enter card details
- Provide billing information
- Confirm the payment
Stripe processes the transaction securely.
Step 4: Confirmation and Balance Update
Once the payment is successfully processed:
- The transaction is recorded in the Deposits section
- The deposit status updates accordingly
- Your wallet balance is credited automatically
Card payments are typically confirmed immediately upon success.
Stablecoin Payment Flow
If you select Pay with Stablecoin, the process includes wallet authorization and blockchain confirmation.
Step 3: Connect Wallet
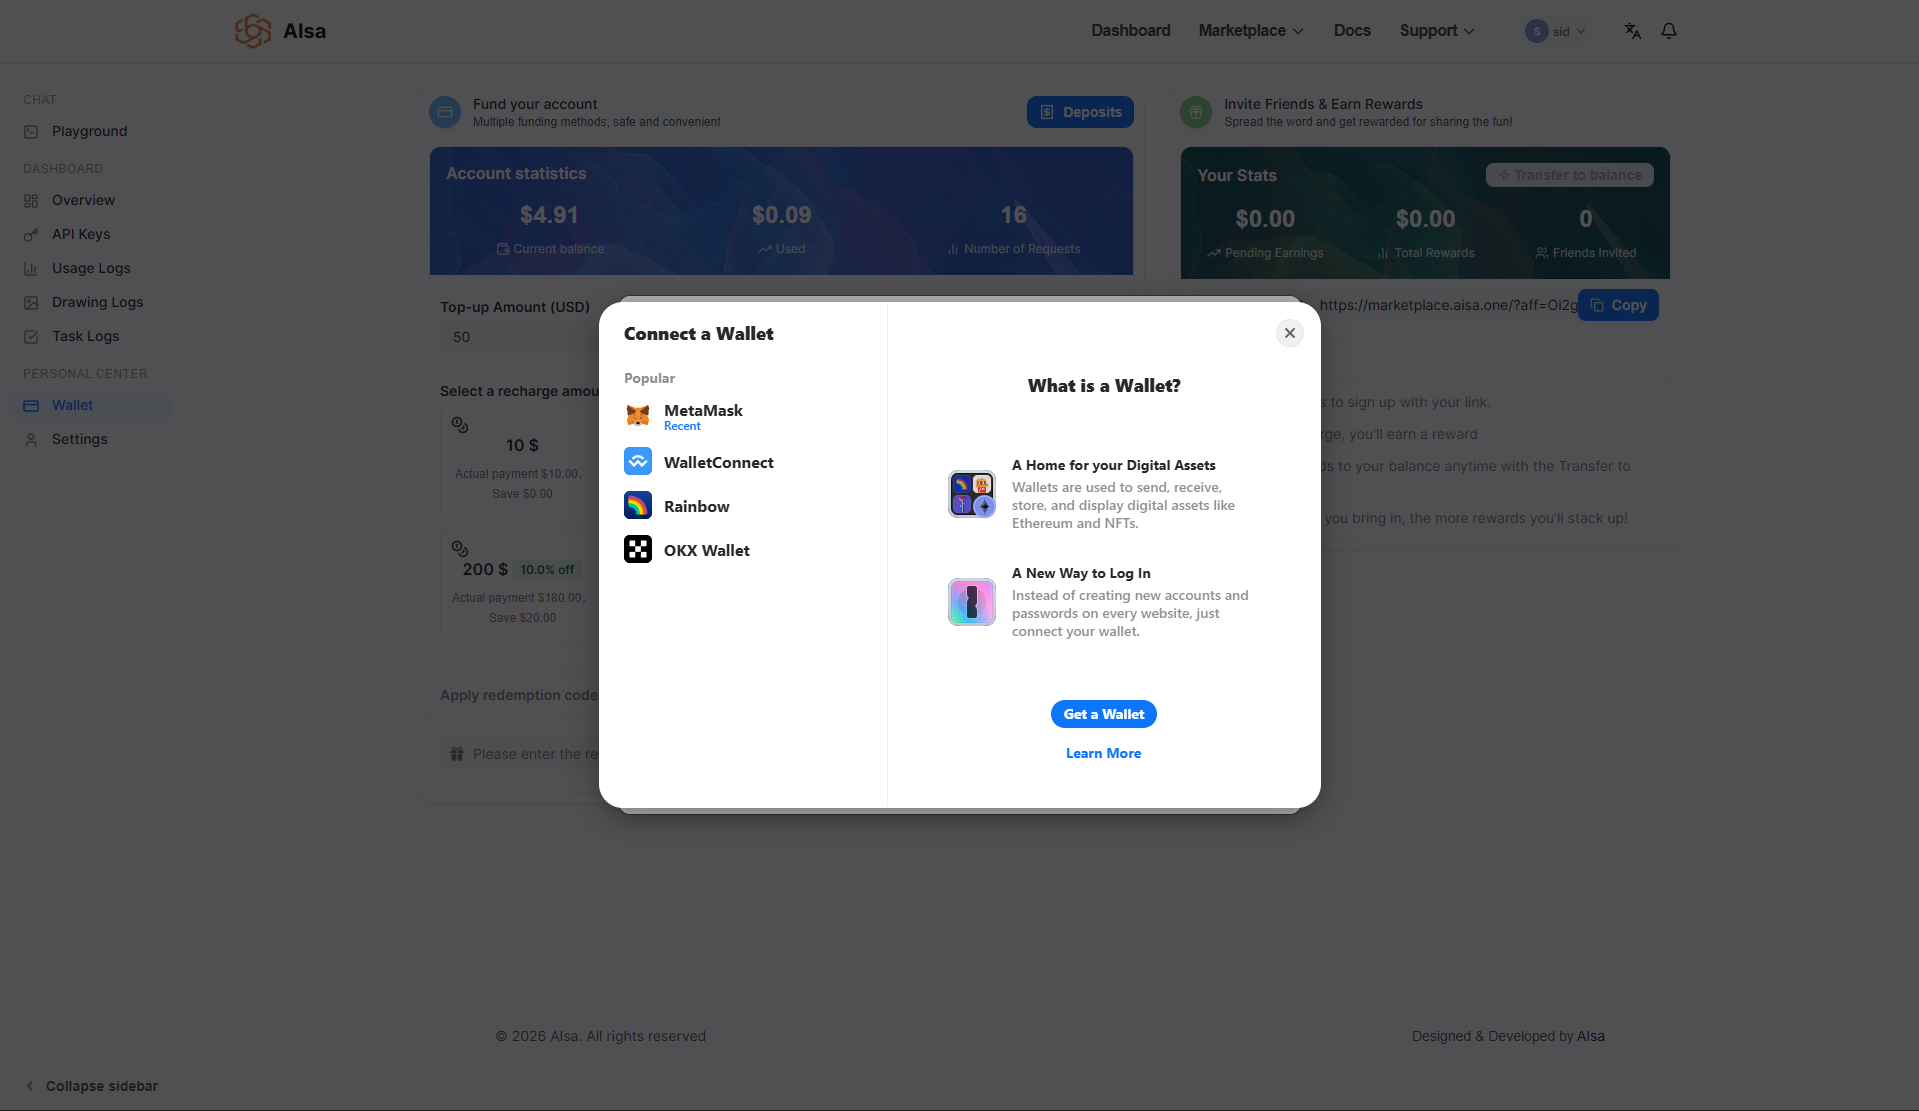
If not already connected, you will be prompted to connect a supported wallet such as:
- MetaMask
- WalletConnect
- Rainbow
- OKX Wallet
Once connected, the wallet address appears in the confirmation modal.
Step 4: Approve Spending Cap
Before transferring funds, you must approve a spending cap request. This allows the platform to withdraw the specified amount of the specified stablecoin (for example, USDC) from your wallet.
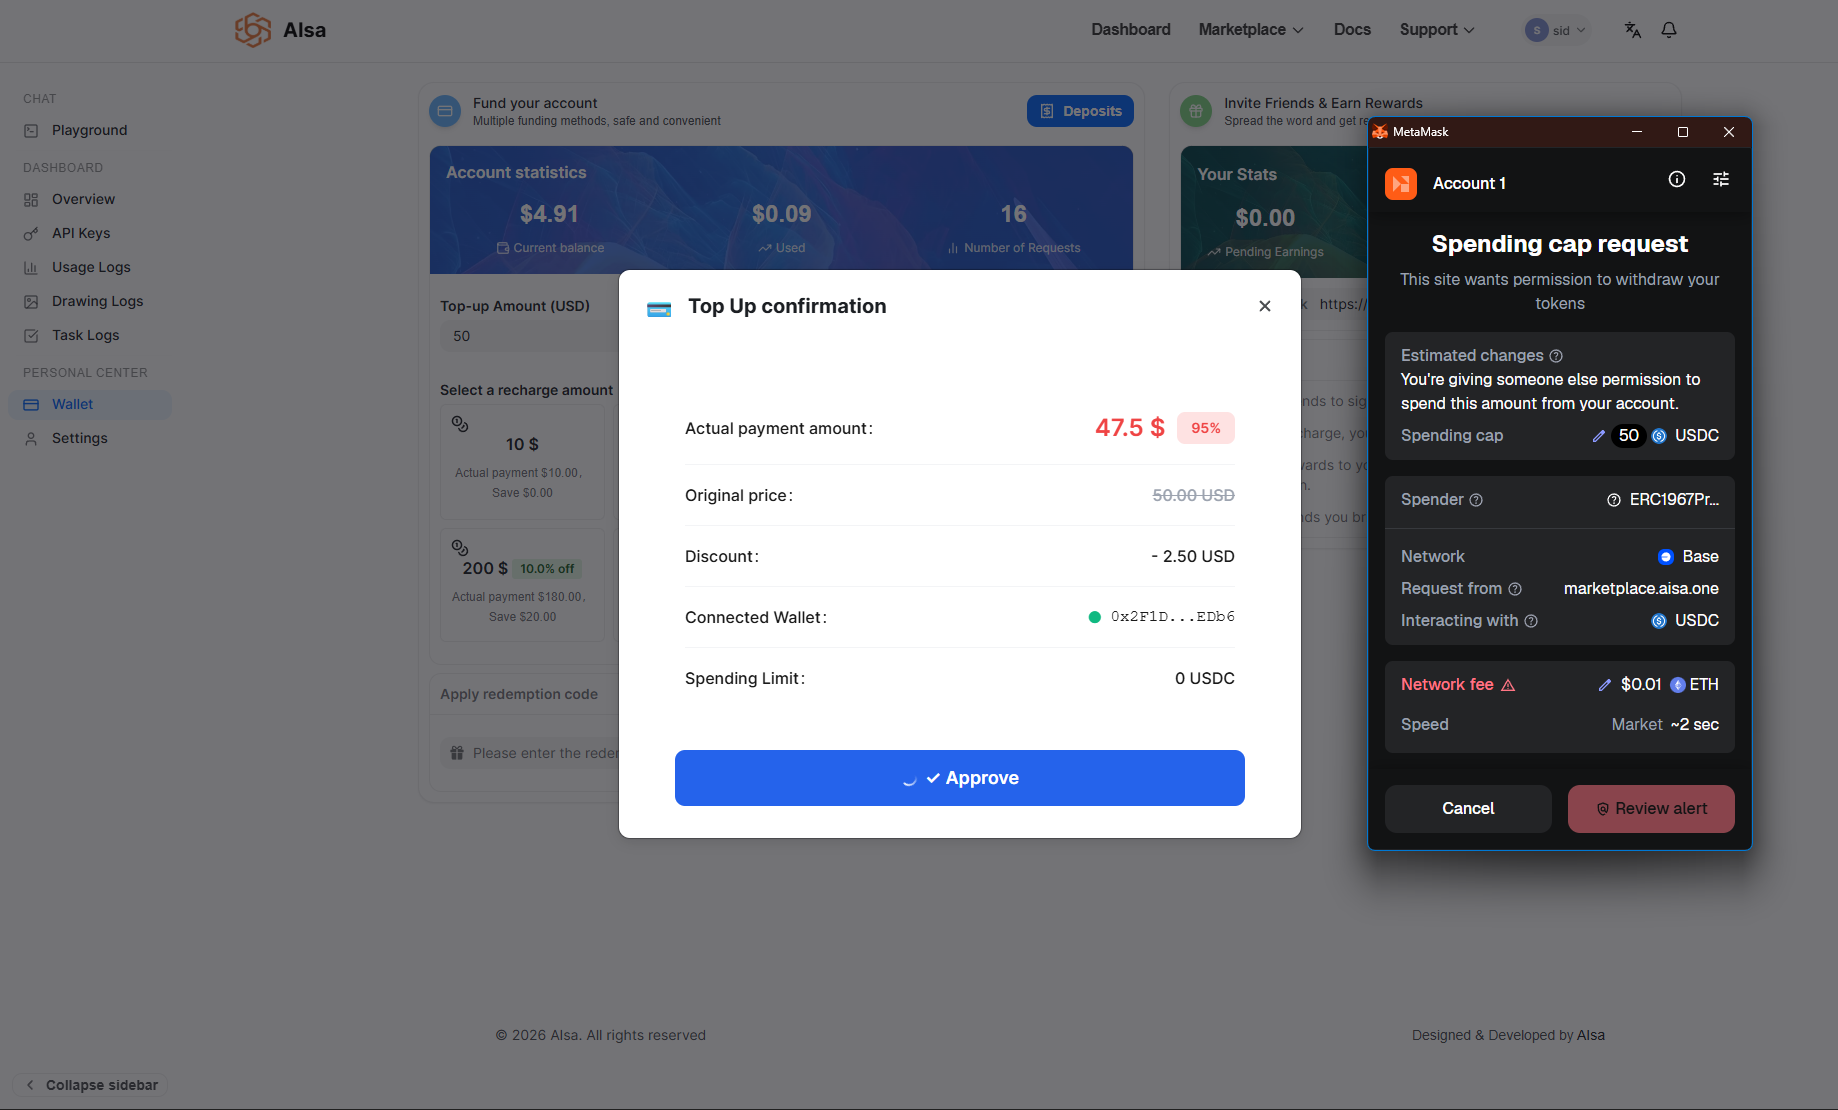
Your wallet interface will display:
- The spending cap amount
- The network
- The token being used
- Estimated network fees
You must approve this transaction before proceeding.
Step 5: Confirm the Payment Transaction
After approving the spending cap:
- You confirm the actual transfer transaction
- The blockchain processes the payment
- Network fees may apply depending on chain conditions
Once the transaction is confirmed on-chain, the deposit is marked as completed.
Tracking Deposits and Payment Status
All funding activity is recorded in the Deposits section.
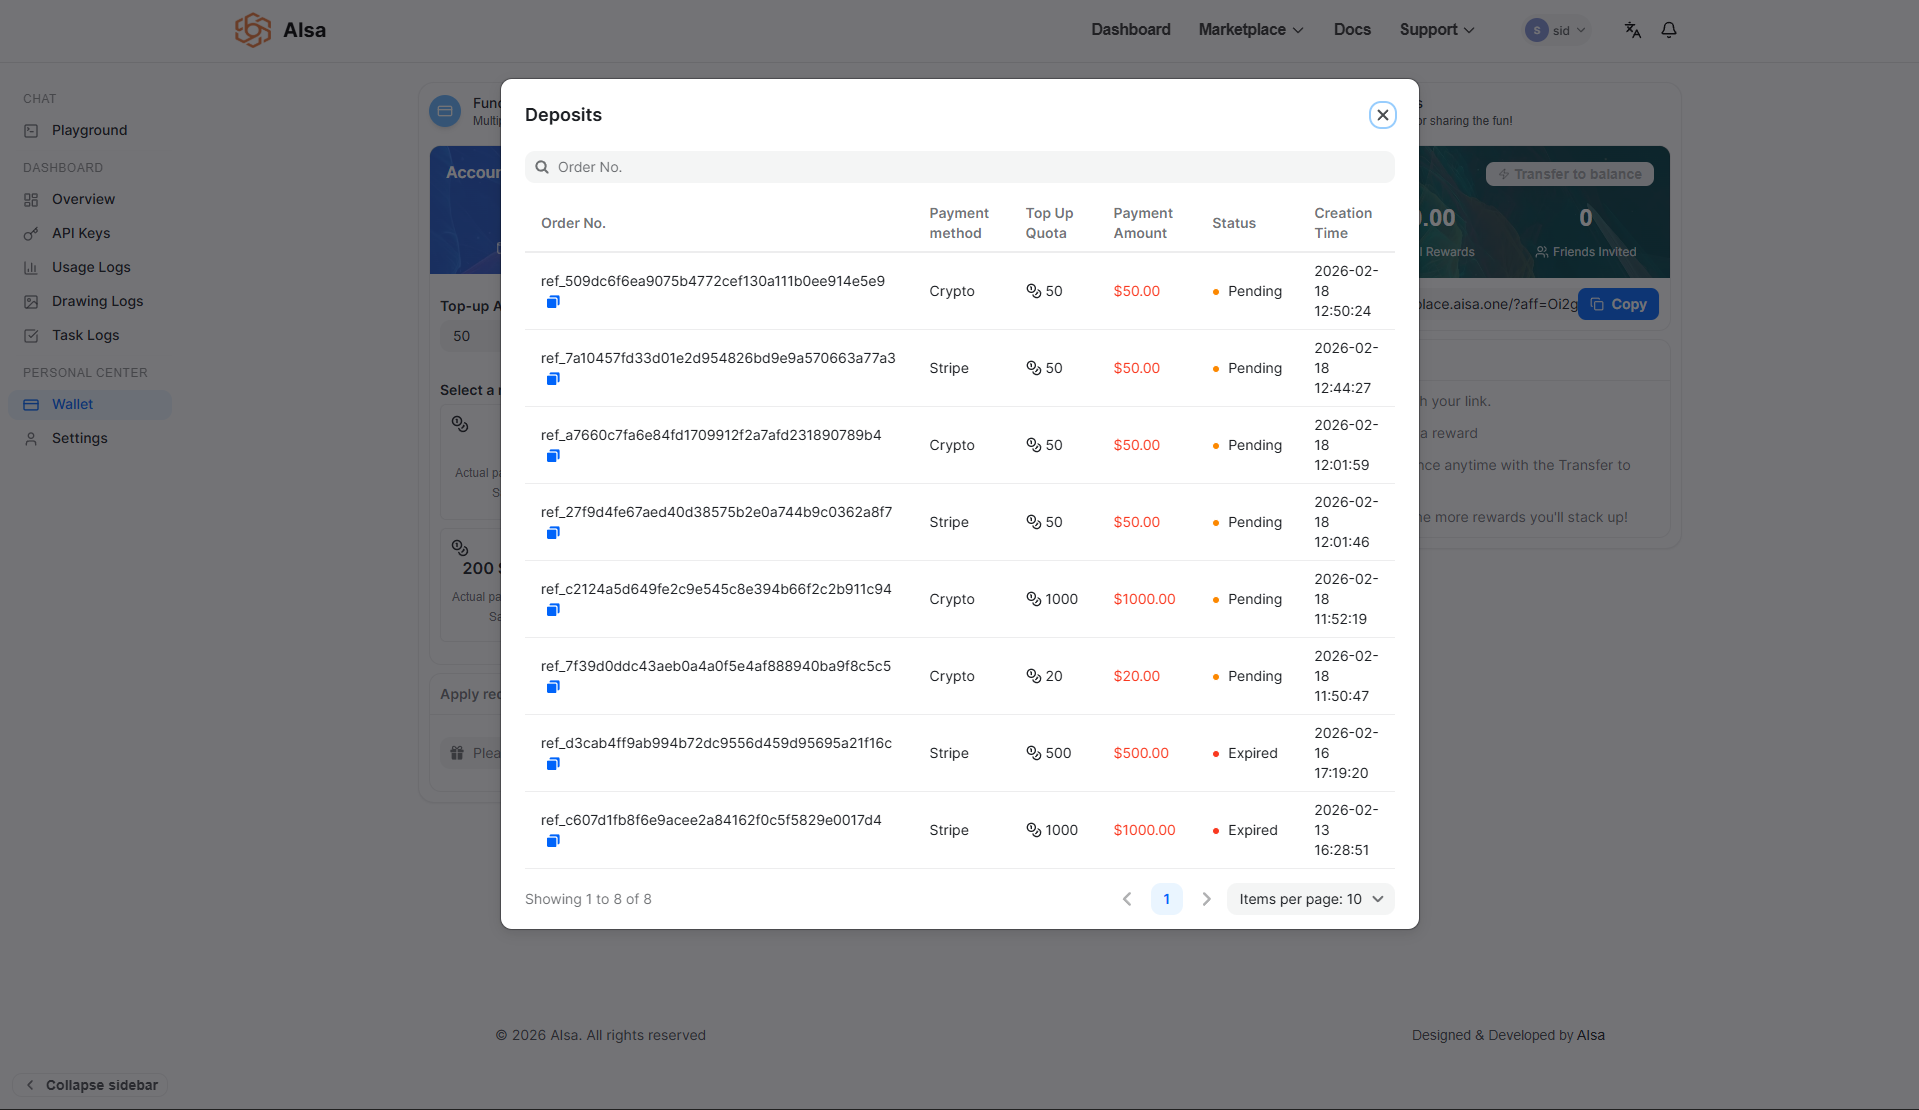
Each deposit entry includes:
- Order number
- Payment method
- Top-up quota
- Payment amount
- Status (such as Pending, Completed, or Expired)
- Creation time
Only completed deposits are credited to your wallet balance. Pending or expired transactions will not affect your available funds.
This section provides full visibility into funding history and ensures transparent tracking of all payments.
Invite Friends & Earn Rewards
In addition to direct funding, AISA offers a referral program that allows you to earn rewards by inviting others to the platform.
You can share your unique invite link with friends or colleagues. When they sign up and recharge their accounts, you earn rewards.
The Wallet page displays:
- Pending earnings
- Total rewards earned
- Number of invited users
Rewards can be transferred to your main balance at any time using the Transfer to balance option.
How Wallet Balance Is Used
Your wallet balance is automatically deducted when you make billable API requests. This includes:
- Token-based AI model usage
- Per-call API usage
- Any other billable platform activity
Each deduction is recorded in the Usage Logs, where you can review detailed cost breakdowns and billing calculations.
Important Notes
- Payments are processed through Stripe or supported stablecoin networks.
- Discounts apply only to eligible recharge tiers.
- Funds are credited only after successful payment confirmation.
- API access may be interrupted if your balance is insufficient.
- All funding and spending activity can be audited through Wallet and Usage Logs.
Updated 14 days ago